Recipes, re-invented from cooking shows
Moroccan Style Breadsticks
Prep. Time:
Baking Time:
Total Time:
1 hour 55 mins
45 mins
3 hours
Serves:
36 breadsticks (28-30 cm)
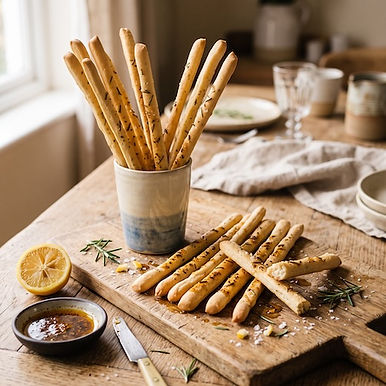
Howard created this dish for Great British Bake Off ™ Series 4. The Bread Week Signature called for thirty-six yeast-raised breadsticks, each at least 25 cm long and crisp enough to snap, and he built the flavor of a Moroccan tagine into them: preserved lemon and rosemary through the dough, a bloome...
Read more
Ingredients
FOR THE DOUGH: Preserved lemon rind, 60 g / about 1/3 cup, weighed before drying (from about 3 small lemons; rind only, pulp and brine discarded) Fine salt, 6 g / 1 tsp (reduced — the rind brings its own salt; see Step 2) Strong white bread flour, 500 g / 3 3/4 cups (12% protein or better) Fast-action dried yeast, 7 g / 2 1/4 tsp Caster (superfine) sugar, 8 g / 2 tsp (feeds the yeast; does not sweeten) Extra virgin olive oil, 40 ml / 3 tbsp Warm water, 270 ml / 1 cup plus 2 tbsp (hold back the last 2 tbsp and judge the dough) Fresh rosemary, 6 g / 2 tbsp chopped (needles only, chopped very fine) Fine semolina, 25 g / 2 tbsp, for dusting the bench
FOR THE RAS EL HANOUT OIL: Extra virgin olive oil, 60 ml / 1/4 cup (mild, not peppery) Ras el hanout, 12 g / 2 tbsp (a whole-spice blend is worth the difference here) Flaky sea salt, 2 g / 1/2 tsp, crushed, for finishing Sesame seeds, 8 g / 1 tbsp, toasted (optional)
EQUIPMENT: Stand mixer with a dough hook, or a bowl and ten minutes of hand kneading Digital scale Two or three large baking sheets, plus parchment A 30 cm strip of stiff card, cut as a length guide Bench scraper Sharp knife and a chopping board Kitchen paper, and a wire rack that fits inside a baking sheet, for drying the rind Small pan for warming the spice oil Soft pastry brush Wire cooling rack
Method
STEP 1: PREPARE THE PRESERVED LEMON
Quarter the preserved lemons. Scrape out and discard the pulp, the membrane and every trace of brine — you want the rind and nothing else. Rinse the rind under cold water and pat it hard between sheets of kitchen paper. Chop it to a 2-3 mm dice, no larger, then spread it on a wire rack set in a baking sheet and dry it in a 100°C / 210°F oven for 10-12 minutes, or press it between fresh kitchen paper for a quarter of an hour. It should feel tacky rather than wet, and it should leave no damp mark on paper. Preserved lemon is roughly two thirds water, and that water carries salt and acid that a lean dough has no use for. The flavor you want lives in the peel oil and survives drying completely.
STEP 2: SCALE THE SALT TO THE LEMON
Preserved lemon rind stays salty after rinsing. The dough salt here is set at 6 g rather than the 9-10 g a 500 g flour batch would normally take, on the assumption that the rind makes up the balance. Taste a scrap of your rind before you mix: if it is fiercely salty, drop the dough salt to 4 g; if your lemons were a mild commercial brand, go up to 7 g. This cannot be corrected once the dough is mixed.
STEP 3: MIX AND KNEAD
Flour into the mixer bowl, yeast on one side, salt and caster sugar on the other. Add the olive oil and most of the warm water and mix on low to bring it together, holding back the last 2 tablespoons until you can feel the dough. Knead on medium for 6-8 minutes, or 10 minutes by hand. This should be a firm, tight, slightly dry dough at roughly 54% hydration. Resist the urge to soften it — a slack dough gives a chewy breadstick, and chewy is exactly what this brief was written to catch.
STEP 4: ADD THE LEMON AND ROSEMARY LAST
Chop the rosemary needles very fine, so that no piece is longer than about 3 mm. Whole or coarsely chopped needles act like tiny blades in a stick this thin and will tear it as you roll. Add the rosemary and the dried lemon rind for the last 45 seconds of kneading only, just long enough to distribute them. Longer mixing shreds the rind and works its remaining moisture back into the crumb.
STEP 5: PROVE
Cover and prove at room temperature for about an hour, until risen by half — not doubled. A big airy prove gives an open crumb, and an open crumb bends instead of snapping. The acidity from the rind slows the yeast slightly, so give it the full hour and judge by the dough rather than the clock.
STEP 6: DIVIDE AND ROLL
Turn the dough out onto a bench dusted with semolina rather than flour — semolina gives grip without softening the surface. Divide into 36 pieces of about 24 g each and weigh them, because uniformity is half of what this challenge is marking. Roll each piece under flat palms from the center outward to 28-30 cm, keeping the diameter even end to end. Lay each one against the card guide before it goes on the sheet. Sticks that finish short of 25 cm fail the brief outright, and sticks that taper fail at the thin end first.
STEP 7: REST UNCOVERED
Lay the sticks on parchment-lined sheets with 2 cm between them and rest them uncovered for 15 minutes. Uncovered is deliberate: a short dry rest sets a skin, and that skin is what lets the surface crisp while the center is still drying out.
STEP 8: BAKE, THEN DRY
Heat the oven to 200°C / 400°F (180°C fan). Bake for 12 minutes, turn the sheets, then bake another 8-10 minutes until evenly pale gold with a little color at the edges. Now drop the oven to 140°C / 275°F and leave them in for a further 12-15 minutes to dry through to the core. This second low stage is what makes the snap. Color is not the test — a stick can be handsomely golden and still be soft in the middle. Cool completely on a wire rack before you judge them; they crisp substantially as they cool.
STEP 9: MAKE THE RAS EL HANOUT OIL
Warm the olive oil in a small pan until it is hand-warm — no hotter, no shimmer. Take it off the heat, stir in the ras el hanout, and leave it to stand for 15 minutes. It will turn the color of dark amber and the cinnamon and rose in the blend will come forward. Do not skip this: a dry blend will not adhere to a baked stick and tastes of dust if it never meets fat, because most of what makes ras el hanout smell like itself is fat-soluble and stays locked up until warm oil opens it.
STEP 10: FINISH
Brush the cooled sticks lightly with the spiced oil — a film, not a coat — then return them to the 140°C / 275°F oven for 5 minutes so the oil sets on the surface rather than soaking in. Scatter with crushed flaky sea salt and the toasted sesame seeds if you are using them, then cool again. If you would rather not re-bake, brush the oil on within an hour of serving instead: oil left sitting on a dry stick will soften it by the next day.
STEP 11: SERVE
Stand them in a tall glass or lay them flat on a board, with the remaining spiced oil alongside for dipping. They are built for a mezze table — labneh, olives, harissa, a bowl of soup.
What next?
Tell us what you'd like and we'll send what you pick.
Video walkthrough

Simpler recipe version
Printable recipe
Weekly recipe digest
Instructions
FOR THE DOUGH:
Preserved lemon rind, 60 g / about 1/3 cup, weighed before drying (from about 3 small lemons; rind only, pulp and brine discarded)
Fine salt, 6 g / 1 tsp (reduced — the rind brings its own salt; see Step 2)
Strong white bread flour, 500 g / 3 3/4 cups (12% protein or better)
Fast-action dried yeast, 7 g / 2 1/4 tsp
Caster (superfine) sugar,(/interesting-ingredients/caster-sugar) 8 g / 2 tsp (feeds the yeast; does not sweeten)
Extra virgin olive oil, 40 ml / 3 tbsp
Warm water, 270 ml / 1 cup plus 2 tbsp (hold back the last 2 tbsp and judge the dough)
Fresh rosemary, 6 g / 2 tbsp chopped (needles only, chopped very fine)
Fine semolina,(/interesting-ingredients/semolina-flour) 25 g / 2 tbsp, for dusting the bench
FOR THE RAS EL HANOUT OIL:
Extra virgin olive oil, 60 ml / 1/4 cup (mild, not peppery)
Ras el hanout, 12 g / 2 tbsp (a whole-spice blend is worth the difference here)
Flaky sea salt,(/interesting-ingredients/flaky-sea-salt) 2 g / 1/2 tsp, crushed, for finishing
Sesame seeds, 8 g / 1 tbsp, toasted (optional)
EQUIPMENT:
Stand mixer with a dough hook, or a bowl and ten minutes of hand kneading
Digital scale
Two or three large baking sheets, plus parchment
A 30 cm strip of stiff card, cut as a length guide
Bench scraper
Sharp knife and a chopping board
Kitchen paper, and a wire rack that fits inside a baking sheet, for drying the rind
Small pan for warming the spice oil
Soft pastry brush
Wire cooling rack


Heading 5
Ingredients
STEP 1: PREPARE THE PRESERVED LEMON
Quarter the preserved lemons. Scrape out and discard the pulp, the membrane and every trace of brine — you want the rind and nothing else. Rinse the rind under cold water and pat it hard between sheets of kitchen paper. Chop it to a 2-3 mm dice, no larger, then spread it on a wire rack set in a baking sheet and dry it in a 100°C / 210°F oven for 10-12 minutes, or press it between fresh kitchen paper for a quarter of an hour. It should feel tacky rather than wet, and it should leave no damp mark on paper. Preserved lemon is roughly two thirds water, and that water carries salt and acid that a lean dough has no use for. The flavor you want lives in the peel oil and survives drying completely.
STEP 2: SCALE THE SALT TO THE LEMON
Preserved lemon rind stays salty after rinsing. The dough salt here is set at 6 g rather than the 9-10 g a 500 g flour batch would normally take, on the assumption that the rind makes up the balance. Taste a scrap of your rind before you mix: if it is fiercely salty, drop the dough salt to 4 g; if your lemons were a mild commercial brand, go up to 7 g. This cannot be corrected once the dough is mixed.
STEP 3: MIX AND KNEAD
Flour into the mixer bowl, yeast on one side, salt and caster sugar on the other. Add the olive oil and most of the warm water and mix on low to bring it together, holding back the last 2 tablespoons until you can feel the dough. Knead on medium for 6-8 minutes, or 10 minutes by hand. This should be a firm, tight, slightly dry dough at roughly 54% hydration. Resist the urge to soften it — a slack dough gives a chewy breadstick, and chewy is exactly what this brief was written to catch.
STEP 4: ADD THE LEMON AND ROSEMARY LAST
Chop the rosemary needles very fine, so that no piece is longer than about 3 mm. Whole or coarsely chopped needles act like tiny blades in a stick this thin and will tear it as you roll. Add the rosemary and the dried lemon rind for the last 45 seconds of kneading only, just long enough to distribute them. Longer mixing shreds the rind and works its remaining moisture back into the crumb.
STEP 5: PROVE
Cover and prove at room temperature for about an hour, until risen by half — not doubled. A big airy prove gives an open crumb, and an open crumb bends instead of snapping. The acidity from the rind slows the yeast slightly, so give it the full hour and judge by the dough rather than the clock.
STEP 6: DIVIDE AND ROLL
Turn the dough out onto a bench dusted with semolina rather than flour — semolina gives grip without softening the surface. Divide into 36 pieces of about 24 g each and weigh them, because uniformity is half of what this challenge is marking. Roll each piece under flat palms from the center outward to 28-30 cm, keeping the diameter even end to end. Lay each one against the card guide before it goes on the sheet. Sticks that finish short of 25 cm fail the brief outright, and sticks that taper fail at the thin end first.
STEP 7: REST UNCOVERED
Lay the sticks on parchment-lined sheets with 2 cm between them and rest them uncovered for 15 minutes. Uncovered is deliberate: a short dry rest sets a skin, and that skin is what lets the surface crisp while the center is still drying out.
STEP 8: BAKE, THEN DRY
Heat the oven to 200°C / 400°F (180°C fan). Bake for 12 minutes, turn the sheets, then bake another 8-10 minutes until evenly pale gold with a little color at the edges. Now drop the oven to 140°C / 275°F and leave them in for a further 12-15 minutes to dry through to the core. This second low stage is what makes the snap. Color is not the test — a stick can be handsomely golden and still be soft in the middle. Cool completely on a wire rack before you judge them; they crisp substantially as they cool.
STEP 9: MAKE THE RAS EL HANOUT OIL
Warm the olive oil in a small pan until it is hand-warm — no hotter, no shimmer. Take it off the heat, stir in the ras el hanout, and leave it to stand for 15 minutes. It will turn the color of dark amber and the cinnamon and rose in the blend will come forward. Do not skip this: a dry blend will not adhere to a baked stick and tastes of dust if it never meets fat, because most of what makes ras el hanout smell like itself is fat-soluble and stays locked up until warm oil opens it.
STEP 10: FINISH
Brush the cooled sticks lightly with the spiced oil — a film, not a coat — then return them to the 140°C / 275°F oven for 5 minutes so the oil sets on the surface rather than soaking in. Scatter with crushed flaky sea salt and the toasted sesame seeds if you are using them, then cool again. If you would rather not re-bake, brush the oil on within an hour of serving instead: oil left sitting on a dry stick will soften it by the next day.
STEP 11: SERVE
Stand them in a tall glass or lay them flat on a board, with the remaining spiced oil alongside for dipping. They are built for a mezze table — labneh, olives, harissa, a bowl of soup.
Comments, or questions, for this recipe
Add a new comment